Blog

  • node-red-contrib-iris


    node-red-contrib-irisLogo

    node-red-contrib-iris

    An interface for Node-RED to InterSystems IRIS Data Platform.


    Requirements


    Installation

    Install the Node-RED package

    Either use the Node-RED Menu – Manage Palette – Install menu, or run the following command in your Node-RED user directory – typically ~/.node-red

    npm install node-red-contrib-iris

    Import Native API

    In the ~/.node-red/settings.js file add module in (already existing) functionGlobalContext:

    functionGlobalContext: {
        // os:require('os'),
        iris: require('./node_modules/node-red-contrib-iris/intersystems-iris-native'),
    }

    You can find the API package under .node-red/node_modules/node-red-contrib-iris/intersystems-iris-native. Please check the README file for supported operating systems. If your OS is not supported you can get the API from your Intersystems IRIS instance under: ~/IRIS/dev/nodejs/intersystems-iris-native.

    See the documentation for how to load additional modules into Node-RED.

    Download Node.IRISInterface

    Go to raw.githubusercontent. Do a right click on the page and choose Save Page As… . Afterwards go to the InterSystems Management Portal and navigate to System Explorer > Classes and click on Import. There you select the file you just downloaded and click Import. When you only operate in one namespace, import the class into this namespace. When you have multiple namespaces you want to have access to, map the class to namespace %ALL.


    Connect to IRIS

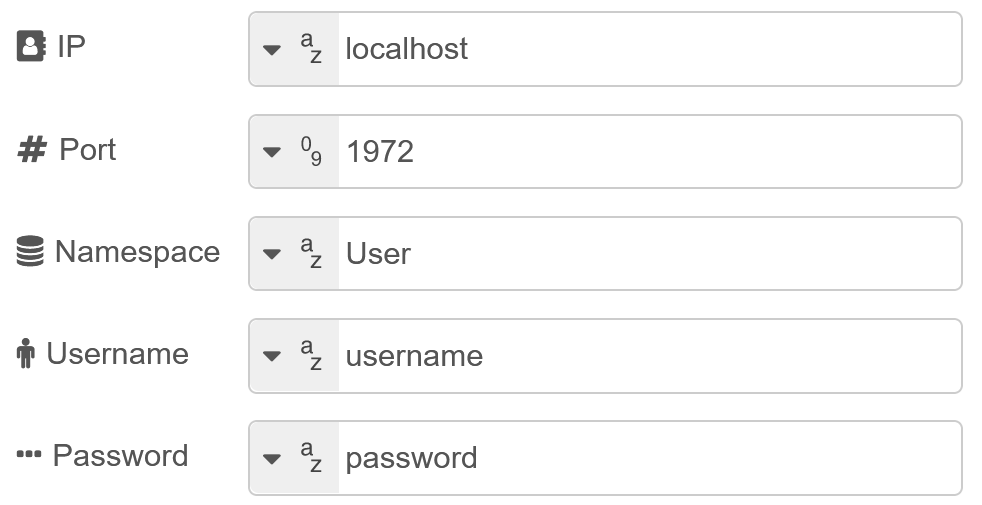
    Set connection properties via the node properties. The Node will build a connection when you deploy and will hold that connection up until you redeploy or disconnect manually.

    NodeProperties

    You can set the default properties in ~/.node-red/node_modules/node-red-contrib-iris/ServerProperties.json. Or use the SetServerProperties flow under Import > Examples > node-red-contrib-iris > SetServerProperties.


    Usage

    The nodes are secure against SQL injection by parametrize the statements. Pass the SQL statement as a string in the msg.data field and the node will parameterize the statement itself.

    msg.data = "SELECT * FROM NodeRed.Person WHERE Age >= 42 AND Name = 'Max' ";

    Or a parameterized statement:

    msg.data = {
        sql: 'SELECT * FROM NodeRed.Person WHERE Age >= ? AND Name = ? ',
        values: [42, 'Max'],
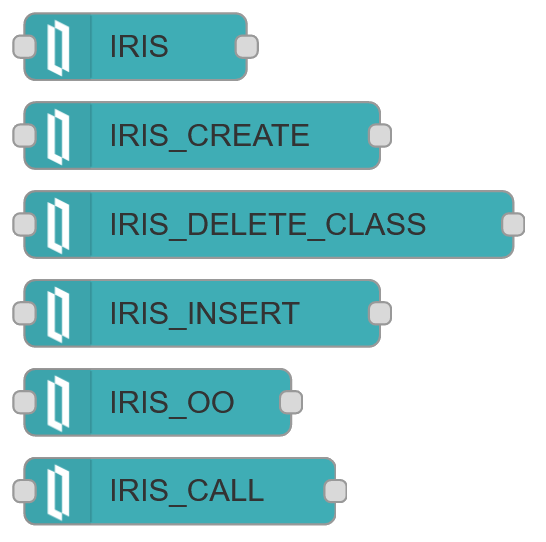
    };

    Nodes

    • IRIS – A Node for executing DML statements such as SELECT, UPDATE, INSERT and DELETE and DDL statements such as CREATE, ALTER and DROP in Intersystems IRIS.
    • IRIS_CREATE – Creates a class in Intersystems IRIS.
    • IRIS_DELETE_CLASS – Deletes a class in Intersystems IRIS.
    • IRIS_INSERT – A Node for only SQL-INSERT-Statements. Can also generate the class, if it does not already exists, based on the statement.
    • IRIS_OO – Can insert a hierarchical JSON-Object.
    • IRIS_CALL – Call Intersystems IRIS classmethods.

    See Node description for further informations.


    Bugs

    • Currently does not work in Docker Container!
    • The statement will be parametrized wrong if whitespaces and commas used in strings. Please parametrize the Statement before. Example:

    Does not work:

    msg.data = "SELECT * FROM NodeRed.Person WHERE Name = 'Smith, John'";

    But this will work:

    msg.data = {
        "sql":"SELECT * FROM NodeRed.Person WHERE Name = ?,
        "values":["Smith, John"]
        }


    npm
    GitHub
    nodered.org
    CHANGELOG
    InterSystems Developer Community


    by Philipp B.
    Powered by InterSystems.

    Visit original content creator repository https://github.com/intersystems-dach/node-red-contrib-iris
  • SetupWindows

    Lets Skip the Boring Bit! 🤪

    This is a collection of Windows scripts to make it easy to setup Windows. This includes application installation, taskbar settings, start menu changes, locale settings, default applications, and more coming soon!

    Prerequisites

    You may not be able to run the .ps1 script directly on the system due to your Execution Policy. You can run the start.bat file making it easy begin. It’ll only run the installApps.ps1 script by default.

    Alternatively, you can run the following in an Administrator Powershell window to allow execution of scripts on your system permanently (Not Recommended).

    Set-ExecutionPolicy -ExecutionPolicy Bypass

    Getting Started

    1. Download the codebase as a .ZIP.
    2. Run start.bat OR one or both of the below commands in a regular CMD window.
    powershell -noexit -ExecutionPolicy Bypass -File installApps.ps1
    powershell -noexit -ExecutionPolicy Bypass -File setupProfile.ps1

    Full Automation

    The scripts accept two optional switch parameters which allow setting up ‘sets’ of programs to install and not asking the operator to confirm installation. They are -AppSet and -NoInterrupt respectively.

    You can run the following command to install basic applications without prompting for the optional programs.

    powershell -noexit -ExecutionPolicy Bypass -File installApps.ps1 -NoInterrupt

    Alternatively, you can run the following to install basic applications, plus CustomSet1 (defined in the appCollection.ps1 file), without interruptions.

    powershell -noexit -ExecutionPolicy Bypass -File installApps.ps1 -NoInterrupt -AppSet CustomSet1

    Creating a Custom Application Set

    Sets of optional applications are defined in the appCollection.ps1 file. This file must be placed in the same root directory as the installApps.ps1 script is being run. The format of the file must be a valid Hash Table.

    Defining Applications

    Application names and associated chocolatey package names are located in the installApps.ps1 script. Simply add additional line or two with optional packages, the script will then ask if you want to install it on the next execution.


    This script uses and depends on Chocolatey for application installations, and SetUserFTA for setting default applications.

    Visit original content creator repository
    https://github.com/AndrewHolloway0/SetupWindows

  • pdf-to-text

    Extract text from a pdf

    Latest Version on Packagist GitHub Workflow Status Software License Quality Score Total Downloads

    This package provides a class to extract text from a pdf.

    use Spatie\PdfToText\Pdf;
    
    echo Pdf::getText('book.pdf'); //returns the text from the pdf

    Spatie is a webdesign agency based in Antwerp, Belgium. You’ll find an overview of all our open source projects on our website.

    Support us

    We invest a lot of resources into creating best in class open source packages. You can support us by buying one of our paid products.

    We highly appreciate you sending us a postcard from your hometown, mentioning which of our package(s) you are using. You’ll find our address on our contact page. We publish all received postcards on our virtual postcard wall.

    Requirements

    Behind the scenes this package leverages pdftotext. You can verify if the binary installed on your system by issueing this command:

    which pdftotext

    If it is installed it will return the path to the binary.

    To install the binary you can use this command on Ubuntu or Debian:

    apt-get install poppler-utils

    On a mac you can install the binary using brew

    brew install poppler

    If you’re on RedHat, CentOS, Rocky Linux or Fedora use this:

    yum install poppler-utils

    If you’re on Windows you can download the Xpdf command line tools and store its content at C:\Program Files\xpdf-tools-win.

    The path to the php2text.exe executable should be C:\Program Files\xpdf-tools-win\bin64\pdftotext.exe.

    Installation

    You can install the package via composer:

    composer require spatie/pdf-to-text

    Usage

    Extracting text from a pdf is easy.

    $text = (new Pdf())
        ->setPdf('book.pdf')
        ->text();

    Or easier:

    echo Pdf::getText('book.pdf');

    By default the package will assume that the pdftotext command is located at /usr/bin/pdftotext. If it is located elsewhere pass its binary path to constructor

    $text = (new Pdf('/custom/path/to/pdftotext'))
        ->setPdf('book.pdf')
        ->text();

    or as the second parameter to the getText static method:

    echo Pdf::getText('book.pdf', '/custom/path/to/pdftotext');

    Sometimes you may want to use pdftotext options. To do so you can set them up using the setOptions method.

    $text = (new Pdf())
        ->setPdf('table.pdf')
        ->setOptions(['layout', 'r 96'])
        ->text()
    ;

    or as the third parameter to the getText static method:

    echo Pdf::getText('book.pdf', null, ['layout', 'opw myP1$$Word']);

    Please note that successive calls to setOptions() will overwrite options passed in during previous calls.

    If you need to make multiple calls to add options (for example if you need to pass in default options when creating the Pdf object from a container, and then add context-specific options elsewhere), you can use the addOptions() method:

    $text = (new Pdf())
        ->setPdf('table.pdf')
        ->setOptions(['layout', 'r 96'])
        ->addOptions(['f 1'])
        ->text()
    ;

    Change log

    Please see CHANGELOG for more information about what has changed recently.

    Testing

     composer test

    Contributing

    Please see CONTRIBUTING for details.

    Security

    If you’ve found a bug regarding security please mail security@spatie.be instead of using the issue tracker.

    Credits

    About Spatie

    Spatie is a webdesign agency based in Antwerp, Belgium. You’ll find an overview of all our open source projects on our website.

    License

    The MIT License (MIT). Please see License File for more information.

    Visit original content creator repository https://github.com/spatie/pdf-to-text
  • Turing-Machine-Simulator

    FLP-PROJECT 2020 – LOGICAL PROJECT – TURING MACHINE

    EXAMPLE OF THE USAGE

    • BUILD: make
    • EXAMPLE RUN: make run
    • ARBITRARY RUN: ./flp20-log < /tests/04.in

    PROGRAM DESCRIPTION

    A program implements the simulation of the non-deterministic Turing Machines.
    The program reads the transitions and initial content of the machine tape
    from the standard input. The transitions have to be in the required following
    format: State, Symbol, NewState, NewSymbol, where State and NewState are
    in the range [A-Z], Symbol and NewSymbol are within the range [a-z],
    or they can be also space, which represents the blank symbol on the
    machine tape. Moreover, the NewSymbol can be equal to L or R, which
    represents the shift of the machine head to the left or right. The states
    S and F represents the starting respectively the finish state of the
    given machine. The initial content of the machine tape has to be symbols
    within the range [a-z] and it has to be in the last line of the input.
    The example inputs you can find in the test directory, respectively in
    the *.in files.

    IMPLEMENTATION

    In the beginning, the given input is loading and subsequently, it is stored
    to the internal representation. We note, when some transition has not the
    required format, then it will ignore during the simulation of the given
    machine. The correctly loaded transitions are storing to the database before
    the start of the simulation (transition). Into the database is also stored
    the initial configuration, which consists of the initial state S and
    given initial content of the machine tape (paths). In the first step, the
    simulation finds all firing transitions from this configuration. Subsequently,
    these transitions are fired and are constructed the new reachable
    configurations. These newly constructed configurations are appended to the
    stored paths in the database. After the first step will be in the database
    stored only the paths with the length equal to two. When some newly
    constructed configuration includes the final state F, then the computation
    halts, otherwise, the next step is performed for these configurations.
    Thus, in this way, after each step, we obtain all reachable configurations
    after the relevant number of performed transitions, and in the database
    will be stored the paths from the initial configuration to these reachable
    configurations. In this iterative way, we will research all reachable
    computation paths, and we are so guaranteed that if there is any path to
    the final state F, the simulation will find it. At the end of the
    computation, when was founded path to the final state, then it is written
    out to the standard output.

    END OF THE SIMULATION

    The simulation of the computation of the Turing Machine can terminate in the
    following different way. When exists the path from the initial configuration
    to the configuration which including the final state, then it will be found
    and write out to the standard output. When such the path does not exist
    and the machine does not offer any other fireable transitions, then
    the computation will halt with the message about the abnormally stopping.
    To this option also belongs the not allowed the shift of the machine head
    to the left outside the machine tape. The last possibility is that the
    machine contains an infinite path where infinitely many transitions are
    fired, in which case the simulation does not end spontaneously.

    AUTOMATION TESTS

    The test directory contains the shell script that serves
    to automatic testing the correctness of this program. In total, the
    test directory includes 13 different inputs, which are considered
    to various aspects of the simulation such as possible infinite iterating
    when the final path exists (test_10), potential delta symbols within
    transitions (test_6) or inputs that do not include the finite
    final paths (test_3), and much more. To run the shell script
    you can use the following command:

    make test
    

    The output will be contained the resulting summaries from tested suites.
    When some test is not successful, then is also printed the expected
    solution in comparison to the solution generated by the program.

    RUNNING TIMES

    We list the run-times of the simulation at the individual testing
    inputs from the attached directory:

    • 01: 0.080s (2); 02: 0.071s (4); 03: 0.066s (e)
    • 04: 0.083s (8); 05: 0.056s (5); 06: 0.066s (4)
    • 07: 0.054s (5); 08: 0.086s (e); 09: 2.814s (35)
    • 10: 0.069s (8); 11: 0.061s (4); 12: 0.065s (8)
    • 13: 0.055s (e)

    Visit original content creator repository
    https://github.com/xstupi00/Turing-Machine-Simulator

  • metalamp-step-2

    Toxin-Hotel Source code

    Requirements

    Npm Dependencies

    Jquery Plugins

    Fonts

    Deploy

    1. Download repo and install needed dependencies:

       git clone https://github.com/sergeyhist/metalamp-step-2.git
       cd metalamp-step-2
       npm install
      
    2. Use one of the avaliable commands below.

    Available Commands

    • Development build:
      Bundle all pages and assets with webpack.config.js in development mode and ‘./dist‘ as output path.

        npm run dev
      
    • Production build:
      Bundle all pages and assets with webpack.config.js in production mode and ‘../hist-webpages/toxin-hotel‘ as output path.

        npm run prod
      
    • Start dev server:
      Run webpack dev server at http://localhost:8080 in development mode with live reloading and ‘./dist‘ as static files directory.

        npm run server
      

    Visit original content creator repository
    https://github.com/sergeyhist/metalamp-step-2

  • requests-lat-long-timezone-locale-ip-api

    🌍 GeoLocation API

    A simple API to retrieve timezone, locale, and geolocation data from an IP address. Perfect for enriching your application with accurate location-based accept-language and timezone details.


    📦 Installation

    Install the package using pip:

    pip install latlongtimezone-api

    🚀 Usage

    Here’s how to get started with the GeoLocation class:

    from geolocation import GeoLocation
    
    # Initialize the GeoLocation class with a proxy (if needed)
    geo = GeoLocation(proxy="http://user:pass@host:port")
    
    # Fetch geolocation data
    geolocation_data = geo.get_geolocation()
    
    # Print the geolocation data
    print(geolocation_data)
    
    # Returns the following dictionary:
    {
        "lat": 48.8566,
        "lon": 2.3522,
        "timezone": "Europe/Paris",
        "locale": "fr-FR",
        "ip": "82.117.11.11"
    }

    🛠️ Features

    • Fetch public IP address
    • Retrieve latitude, longitude, timezone, and locale
    • Cache results using Redis for faster subsequent lookups

    📋 Requirements

    To use this package, you’ll need:

    • Python 3.6+
    • requests library
    • redis library
    • python-dotenv library

    Install the necessary dependencies with:

    pip install requests redis python-dotenv

    🔧 Configuration

    Set up your Redis and proxy configurations in a .env file:

    REDIS_HOST=localhost
    REDIS_PORT=6379
    REDIS_DB=0
    REDIS_PASSWORD=yourpassword
    

    🌟 Contributing

    Contributions are welcome! If you have suggestions or improvements, feel free to:

    1. Open an issue to discuss the changes.
    2. Submit a pull request with your enhancements.

    👤 Author

    dormic97GitHub Profile


    📝 License

    This project is licensed under the MIT License. See the LICENSE file for details.


    Happy coding! 🎉


    This version includes improved formatting, readability, and a clear flow for anyone using the API.

    Visit original content creator repository
    https://github.com/pim97/requests-lat-long-timezone-locale-ip-api

  • bas-celik

    Baš Čelik

    Go Reference Go Report Card

    Baš Čelik je čitač elektronskih ličnih karata, zdravstvenih knjižica i saobraćajnih dozvola. Program je osmišljen kao zamena za zvanične aplikacije poput Čelika. Nažalost, zvanične aplikacije mogu se pokrenuti samo na Windows operativnom sistemu, dok Baš Čelik funkcioniše na tri operativna sistema (Windows/Linux/OSX).

    Baš Čelik je besplatan program, sa potpuno otvorenim kodom dostupnim na adresi github.com/ubavic/bas-celik.

    Dodatna dokumentacija se može naći u wikiju projekta

    Note

    Baš Čelik is software for reading smart-card documents issued by the government of Serbia. Supported cards include ID cards, vehicle registration cards, and medical insurance cards. The application is written completely from scratch in Go and supports Linux, macOS, and Windows. The rest of this document is in Serbian, but the entire codebase is in English, and the interface includes English support. Additional information can be found in the project wiki.

    Interfejs

    Upotreba

    Povežite čitač za računar i pokrenite Baš Čelik. Ubacite karticu u čitač. Program će pročitati informacije sa kartice i prikazati ih. Tada možete sačuvati PDF pritiskom na donje desno dugme.

    Kreirani PDF dokument izgleda maksimalno približno dokumentu koji se dobija sa zvaničnim aplikacijama.

    Kriptografski elementi

    Aplikacija dozvoljava čitanje sertifikata sa lične karte kao i promenu PIN-koda. Čitanje sertifikata sa ostalih dokumenata je u planu.

    Smartbox mod

    Baš Čelik može da emulira aplikaciju Smartbox koja se koristi za prijavu na portal ePorezi. Smartbox mod se aktivira ili deaktivira kroz korisnička podešavanja, nakon čega je potrebno restartovati aplikaciju.

    Podaci o overi zdravstvene knjižice

    Podatak o trajanju zdravstvenog osiguranja (overena do), ne zapisuje se na knjižicu prilikom overe. Zvanična RFZO aplikacija preuzima ovaj podatak sa web servisa, i zbog toga je ista funkcionalnost implementirana i u Baš Čeliku. Pritiskom na dugme Ažuriraj, preuzima se podatak o trajanju osiguranja. Pri ovom preuzimanju šalje se LBO broj i broj zdravstvene kartice.

    Pokretanje u komandnoj liniji

    Baš Čelik prihvata sledeće opcije:

    • -atr: ATR kôd kartice biće prikazan u konzoli.
    • -excel PATH: grafički interfejs neće biti pokrenut, a sadržaj dokumenta biće direktno sačuvan u Excel datoteku (xlsx) na PATH lokaciji. U Excel datoteku će biti sačuvana samo tekstualna polja, ne i slike.
    • -help: informacija o opcijama biće prikazana u konzoli.
    • -json PATH: grafički interfejs neće biti pokrenut, a sadržaj dokumenta biće direktno sačuvan u JSON datoteku na PATH lokaciji.
    • -list: lista raspoloživih čitača biće prikazana u konzoli.
    • -pdf PATH: grafički interfejs neće biti pokrenut, a sadržaj dokumenta biće direktno sačuvan u PDF datoteku na PATH lokaciji.
    • -reader INDEX: postavlja odabrani čitač za čitanje podataka. Parametar INDEX označava prirodan broj koji je naveden u ispisu list komande. Izbor utiče samo na čitanje sa atr, excel, pdf i json opcijama.
    • -rfzoValidUntil: informacija o trajanju zdravstvenog osiguranja biće preuzeta sa RFZO portala. Ne odnosi se na grafički interfejs niti na ostala dokumenta.
    • -verbose: tokom rada aplikacije detalji o greškama biće prikazani u konzoli.
    • -version: informacija o verziji programa biće prikazana u konzoli.

    U slučaju excel, json i pdf opcija, program ne dodaje ekstenziju na kraj lokacije koju je korisnik naveo.

    Pri pokretanju sa atr, excel, json ili pdf opcijom, program očekuje da je kartica smeštena u čitač i neće čekati na ubacivanje kartice kao što je to slučaj sa grafičkim okruženjem.

    Pri pokretanju sa atr, help, list ili version opcijama podaci sa kartice neće biti očitani (osim ATR koda u slučaju atr komande). Program će prestati izvršavanje nakon ispisa odgovarajuće informacije.

    Čitači i drajveri

    Baš Čelik bi trebalo da funkcioniše sa svim čitačima pametnih kartica koji su trenutno dostupni u prodaji (Gemalto, Hama, Samtec…). Korisnici Windows (7, 8, 10, 11) i macOS operativnih sistema ne moraju da instaliraju nijedan dodatni program (drajver).

    Preuzimanje

    Izvršne datoteke poslednje verzije programa možete preuzeti sa Releases stranice.

    Kompilacija

    Potrebno je posedovati go kompajler. Na Linuksu je potrebno instalirati i libpcsclite-dev i pakete za Fyne (možda i pkg-config).

    Nakon preuzimanja repozitorijuma, dovoljno je pokrenuti

    go mod download
    go build -v
    

    Prva kompilacija može potrajati nekoliko minuta (i do deset), jer je neophodno da se preuzmu i kompajliraju sve Golang biblioteke. Sve naredne kompilacije se izvršavaju u nekoliko sekundi.

    Arhitektura aplikacije

    Aplikacija je podeljena na sledeće pakete:

    • document – paket definiše tri tipa IdDocument, MedicalDocument i VehicleDocument koji zadovoljavaju Document interfejs. Ovi tipovi se koriste kroz celu aplikaciju. Uz definicije tipova, implementirane su i metode za eksport struktura u PDF i JSON.
    • card – paket definiše funkcije za komunikaciju sa pametnim karticama i funkcije za parsiranje Document struktura iz TLV i BER datoteka.
    • internal – paket sa funkcijama za pokretanje programa, parsiranje argumenata komandne linije, itd… Uključuje i paket gui sa definicijom grafičkog interfejsa.
    • localization – skup pomoćnih funkcije da za formatiranje datuma, podršku za različita pisma, itd..

    Ostali direktorijumi u okviru projekta:

    • embed i assets – dodatne datoteke. Datoteke iz embed se linkuju u izvršnu verziju prilikom kompilacije.
    • docs – interna i eksterna dokumentacija

    Doprinos

    Pre kreiranja issue-a i pull request-ova, pročitati CONTRIBUTING.md.

    Licenca

    Program i izvorni kôd su objavljeni pod MIT licencom.

    Font Liberation je objavljen pod SIL Open Font licencom.

    Visit original content creator repository https://github.com/ubavic/bas-celik
  • ghec-audit-log-cli

    Warning

    This repository has been deprecated and is no longer maintained

    The features of this tool are now natively supported in GitHub, please explore the following options;

    CLI for the Audit Log using GHEC

    This CLI made in node helps on querying the audit log. It can query the full
    audit providing all the data the API can serve, or, given a cursor, it can
    provide the newest entries from that specific moment.

    You can build an sh script on top of this one to store the data or query it.

    CLI arguments

    This script can take the following arguments:

    > node ghec-audit-log-cli.js "--help"
    
    Usage: audit-log-ghec-cli [options]
    
    Options:
      -v, --version             Output the current version
      -t, --token <string>      the token to access the API (mandatory)
      -o, --org <string>        the organization we want to extract the audit log from
      -cfg, --config <string>   location for the config yaml file. Default ".ghec-audit-log" (default: "./.ghec-audit-log")
      -p, --pretty              prints the json data in a readable format (default: false)
      -l, --limit <number>      a maximum limit on the number of items retrieved
      -f, --file <string>       the output file where the result should be printed
      -a, --api <string>        the version of GitHub API to call (default: "v4")
      -at, --api-type <string>  Only if -a is v3. API type to bring, either all, web or git (default: "all")
      -c, --cursor <string>     if provided, this cursor will be used to query the newest entries from the cursor provided. If not present, the result will contain all the audit log from the org
      -s, --source              indicate what source to use for the audit logs. Valid options are enterprise or org. Default: "org"
      -h, --help                display help for command
    

    Optionally, you can create a file called .ghec-audit-log that supports
    the token and organization, and omit the parameters while running the script.

    org: org-name
    token: xxxxxxxxxxxxxxxx

    About tokens and scopes

    To use this CLI you will need to use a personal access token (PAT) with the correct scopes. The scopes will change depending on what source you are going to use to export the audit logs.

    Endpoint source Needed scopes
    User read:user
    Repository public_repo
    Organization read:org
    Enterprise admin:enterprise

    If you are running this utility against a GHEC account, we recommend that you create your PAT with both scopes.

    Running the CLI

    Execute the command using node or npm

    Pre-requisites

    Install the node dependencies:

    $ git clone https://github.com/github/ghec-audit-log-cli
    $ cd ghec-audit-log-cli
    $ npm install

    npm

    $ npm run start -- --pretty

    node

    $ node ghec-audit-log-cli --pretty

    Installing as CLI

    Optionally you can install the script as a CLI and run it from the command line. To install it run:

    $ git clone https://github.com/github/ghec-audit-log-cli
    $ cd ghec-audit-log-cli
    $ npm link

    Then you can execute the script as a CLI using:

    $ ghec-audit-log-cli -v

    Forwarding the log using GitHub Actions

    One of the most common uses of the CLI is to forward the log using GitHub actions. You can
    use as an starter workflow the ones provided in this repository for v3 or v4
    and integrate it with your favorite service.

    This workflow:

    • Runs periodically
    • Grabs any existing cursor as the last item grabbed from the log
    • Grabs the latest changes from the audit log
    • Forwards those changes to a service
    • Commits the latest cursor for the next call

    Releases

    To create a new release of the ghec-audit-log-cli:

    How to use

    • Clone the audit-log-cli repository to your Organization
    • Set the Action to run on Cron
    • Create the GitHub Secrets needed to authenticate
    • Enjoy the logs

    Secret Values

    You will need to create the following Github Secrets To allow the tool to work:

    • AUDIT_LOG_TOKEN
      • This is a GitHub Personal Access Token used to authenticate to your Organization
      • Note: The token must have the admin:org set to be able to pull information
    • ORG_NAME
      • Name of the GitHub Organization to poll the audit log
    • WEBHOOK_URL
      • URL to a service where the generated json information is piped
    • COMMITTER_EMAIL
      • Email address for one of the primary committers on the repository

    Notes

    • Modify the polling workflow to run on a cron, instead of push
    • The Organization must be a part of a GitHub Enterprise or the API calls will fail
    • The Personal Access token must be SSO enabled to query the GitHub Organization if it is enabled

    Disclaimer

    1. This CLI provides all the events that the GitHub API offers through the GraphQL API. This is a subset of all the events that you can see through the UI.
    2. This tool will be deprecated when GitHub adds a forwarding behavior on GHEC.

    Visit original content creator repository
    https://github.com/github/ghec-audit-log-cli

  • http-monitoring-console

    HTTP Log Monitoring Console App

    Acceptance Criteria

    Create a simple console program that monitors HTTP traffic on your machine:

    • Consume an actively written-to w3c-formatted HTTP access log (https://en.wikipedia.org/wiki/Common_Log_Format)
    • Every 10s, display in the console the sections of the web site with the most hits (a section is defined as being what’s before the second “https://github.com/” in a URL. i.e. the section for “http://my.site.com/pages/create‘ is “http://my.site.com/pages“), as well as interesting summary statistics on the traffic as a whole.
    • Make sure a user can keep the console app running and monitor traffic on their machine
    • Whenever total traffic for the past 2 minutes exceeds a certain number on average, add a message saying that “High traffic generated an alert – hits = {value}, triggered at {time}”
    • Whenever the total traffic drops again below that value on average for the past 2 minutes, add another message detailing when the alert recovered
    • Make sure all messages showing when alerting thresholds are crossed remain visible on the page for historical reasons.
    • Write a test for the alerting logic
    • Explain how you’d improve on this application design

    Requirements

    • Python3 & pip3 installed
    • Minimal terminal size 145×25

    Install

    make install
    

    Usage

    usage: http-monitor [-h] [--file FILE] [--threshold THRESHOLD]
        [--section_expiration SECTION_EXPIRATION]
        [--section_refresh SECTION_REFRESH]
    
    # e.g: http-monitor --file access.log --threshold 100 --section-expiration 120 --section-refresh=10
    

    usage: http-generator [-h] [--file FILE] [--per_second PER_SECOND]
    
    # e.g: http-generator --file access.log --per-second=100
    

    Code Structure

    ├── bin
    │   ├── http-generator
    │   └── http-monitor
    ├── src
    │   ├── monitoring
    │   │   ├── __init__.py
    │   │   ├── parser.py
    │   │   └── traffic.py
    │   ├── utils
    │   │   ├── __init__.py
    │   │   └── topic.py
    │   ├── widgets
    │   │   ├── __init__.py
    │   │   ├── alert.py
    │   │   ├── section.py
    │   │   └── stat.py
    │   ├── __init__.py
    │   ├── alert.py
    │   └── entry.py
    ├── tests
    │   └── monitoring
    │       ├── test_logparser.py
    │       └── test_traffic.py
    ├── .editorconfig
    ├── .gitattributes
    ├── .gitignore
    ├── LICENSE.md
    ├── Makefile
    ├── README.md
    ├── requirements.txt
    └── setup.py
    

    License

    This package is open-sourced software licensed under the MIT license.

    Visit original content creator repository
    https://github.com/kevinsimard/http-monitoring-console

  • elo7

    Sobre o projeto

    Este é um projeto simples que apresenta uma única página com uma listagem de vagas na Elo7. O objetivo do projeto é fornecer uma interface amigável e fácil de usar para visualizar e filtrar vagas disponíveis.

    Case
    Design

    📝 Tabela de conteúdos

    ⛏️ Tecnologias Utilizadas

    • Next.js: Framework de React para desenvolvimento de aplicações web.
    • TypeScript: Linguagem de programação para tipagem estática de dados.
    • SASS: linguagem de extensão do CSS para desenvolvimento de estilos.
    • Plaiceholder: Biblioteca para geração de placeholders de imagem.

    Testes:

    • Jest: Framework usado para testes unitários.
    • Cypress: Ferramenta de teste de interface de usuário para testes de integração e end-to-end.

    Ferramentas de Desenvolvimento:

    • Prettier: Ferramenta para formatação de código.
    • ESLint: Ferramenta para análise estática de código em JavaScript e TypeScript.

    👉 Como executar o projeto

    1. Instale as dependências do projeto:

      npm install
    2. Execute a aplicação:

      npm run dev
    3. Para executar os testes unitários:

      npm run test

      ou para executar seus testes a cada mudança feita:

      npm run test:watch
    4. Para executar os testes end-to-end:

      npm run cypress:open

    Abra http://localhost:3000 no seu browser para ver a aplicação.

    🔎 Estrutura do Projeto

    A aplicação segue uma estrutura de código organizada e modular, facilitando a manutenção e extensão do projeto. Aqui está uma visão geral da estrutura do diretório:

    /
    ├── 📂 cypress/
    ├── 📂 public/
    ├── 📂 src/
    │   ├── 📂 __tests__/
    │   ├── 📂 app/
    │   ├── 📂 components/
    │   ├── 📂 constants/
    │   ├── 📂 hooks/
    │   ├── 📂 lib/
    │   ├── 📂 services/
    │   ├── 📂 styles/
    │   │   ├── 📂 elements
    │   │   │   ├── 🟪 _typography.scss
    │   │   │   └── ...etc
    │   │   ├── 📂 generic
    │   │   │   ├── 🟪 _reset.scss
    │   │   │   └── ...etc
    │   │   ├── 📂 objects
    │   │   │   ├── 🟪 _grid.scss
    │   │   │   └── ...etc
    │   │   ├── 📂 settings
    │   │   │   ├── 🟪 _colors.scss
    │   │   │   └── ...etc
    │   │   ├── 📂 tools
    │   │   │   ├── 🟪 _breakpoints.scss
    │   │   │   └── ...etc
    │   │   └── 🟦 main.scss
    │   ├── 📂 types/
    │   ├── 📂 utils/
    ├── ⬜ cypress.config.ts
    ├── ⬜ jest.config.ts
    ├── ⬜ next.config.ts
    ├── ⬜ README.md

    Descrição das pastas

    /cypress

    Esta pasta contém os testes de integração e end-to-end escritos com Cypress, uma ferramenta de automação de testes.

    /public

    Contém os arquivos estáticos da aplicação, como ícones e imagens.

    /src

    • /__tests__: Contém os testes unitários dos componentes.

    • /app: Contém o componente principal da aplicação, onde ficam estruturadas as páginas e rotas da API e sua inicialização.

    • /components: Contém componentes reutilizáveis da aplicação.

    • /constants: Contém constantes utilizadas em todo o projeto.

    • /hooks: Contém custom hooks reutilizáveis em vários componentes.

    • /lib: Contém bibliotecas e módulos auxiliares utilizados no projeto.

    • /services: Contém serviços responsáveis pela lógica de negócio e integração com APIs.

    • /styles: Esta pasta é organizada de acordo com o padrão ITCSS (clique aqui para saber mais sobre essa arquitetura), que facilita a manutenção e escalabilidade dos estilos CSS.

      ITCSS

      • settings: Contém variáveis e configurações globais.
        Exemplo: _colors.scss: Definições de cores.

      • tools: Contém mixins, funções e ferramentas de SASS.
        Exemplo: _breakpoints.scss: Definições de breakpoints para responsividade.

      • generic: Contém estilos globais e genéricos aplicados em toda a aplicação.
        Exemplo: _reset.scss: Estilos de reset para normalizar os estilos dos navegadores.

      • elements: Contém estilos básicos de elementos HTML.
        Exemplo: _typography.scss: Estilos de tipografia.

      • objects: Contém estilos de layout e estrutura da aplicação.
        Exemplo: _grid.scss: Estilos de grid.

      • main.scss: Arquivo principal que importa todos os estilos necessários para o tema base.

    • /types Contém definições de tipos TypeScript utilizadas em todo o projeto.

    • /utils Contém funções utilitárias e helpers usados em toda a aplicação.

    • Outros Arquivos

      • cypress.config.ts: Arquivo de configuração do Cypress.
      • jest.config.ts: Arquivo de configuração do Jest.
      • next.config.ts: Arquivo de configuração do Next.js.

    🔨 Melhorias

    • Adicionar dados estruturados na estruturação da página, tais como Job Posting, Estimated salary e Breadcrumb.
    • Para melhorar o carregamento dos ícones no mobile e em alguns browsers, pode ser criado uma sprit com os ícones
    Visit original content creator repository https://github.com/Keemluvr/elo7