Therefore, you first need to install Scriptable from the App Store.
Preview
User Guide
Description
The project includes bwh_monitor.js and bwh_monitor_mini.js, and it is recommended to use medium widgets and small widgets accordingly.
The small widget omits field descriptions due to space constraints and retains only the icons. The correspondence for all icons is as follows:
📌 Node info
🖥 IP address
🪫 RAM usage
💿 Disk space
⏳ Data used
⏱️ Data reset time
Get API Key
Access the API module in the Kiwi control panel to obtain veid and apikey.
Add component and configure parameters.
When adding a component, use Parameter to pass arguments.
There are three parameters:
veid: The veid obtained from Kiwi.
apikey: The apikey obtained from Kiwi.
title: [Optional] The title of the widget. If not specified, the hostname will be used as the default title.
The parameters can be passed as follows:
# Required parameters
veid=1xxxxx&apikey=private_xxxxxxxxxxxxxxxxxx

OR

# The title parameter is optional
veid=1xxxxx&apikey=private_xxxxxxxxxxxxxxxxxx&title=I_AM_Title
Thank you & References
Inspiration and code copied from, thanks to @412999826 for open-sourcing.
Esse repositório serve para documentar a organização dos nossos eventos.
Aqui não teremos informações sobre um evento específico (como o de 2017, 2018, 2019, por exemplo), mas a maneira de se montar um hackathon estilo o nosso, garantindo assim que qualquer pessoa possa “copiar” nosso modelo e criar os seus próprios hackathon’s.
Organização geral
A organização do evento conta com uma bancada organizadora e uma bancada avaliadora, onde:
a bancada organizadora é constituída pelas pessoas que fazem o evento acontecer, como responsáveis pelo site, divulgação, organização e resposta a dúvidas das pessoas que competirão.
a bancada avaliadora é um time de pessoas com alto skill técnico que irá votar nos melhores projetos entregues pelas pessoas que estão competindo.
1 – Formato
Nosso evento é 100% online.
As pessoas que participam da competição podem se juntar em um local e trabalharem juntos, porém qualquer pessoa, de qualquer lugar do mundo, pode participar da maratona se garantir uma maneira de se comunicar com sua equipe.
No dia da entrega dos prêmios, as pessoas que conseguirem fazer isso, podem se juntar para assistir a nomeação da equipe vencedora em um local com internet.
1.1 – onde armazenar o código durante a competição
Todo código gerado pelas equipes deve ser hospedado em um repositório privado, e para isso sugerimos o GitHub, GitLab ou Bitbucket, e ao finalizar a competição as pessoas podem tornar seus repositórios públicos.
No repositório da edição (2017, 2018, 2019, etc) deixaremos uma lista de nomes das pessoas que participaram e um local de exposição de quem venceu.
1.2 – times
Os times serão compostos de 3 a 5 pessoas, e será necessário, no mínimo, 5 times para que o evento aconteça.
As pessoas irão se inscrever via formulário (TypeForm, Google Forms, etc) somente para que a organização tenha seus emails de contato, links para redes sociais e habilidades.
No repositório da edição teremos um documento com os times formados, e quem não tiver um time terá seu nome listado para que as pessoas puxem para suas equipes.
Cada time irá contar com uma pessoa mentorando o grupo (não necessáriamente alguém do projeto Mentoria) para auxiliar em pequenas dúvidas, mas não podendo escrever código.
Importante: Esta pessoa deverá possuir apenas acesso de Leitura no repositório da equipe, ela será responsável por encaminhar o projeto à bancada avaliadora no final do período.
1.3 – quem pode participar
Só podem concorrer pessoas com até, no máximo, 3 anos de experiência.
As pessoas que forem competir devem estar com seu LinkedIn atualizado.
As pessoas de um mesmo time não podem todas possuir o mesmo tempo de experiência.
Ex.: todas as 5 pessoas com 3 anos de XP, enquanto um outro time pussui somente pessoas com 1 ano.
Para que isso não aconteça, as pessoas deverão se comunicar bem antes de montar o time, mas podem possuir até 2 pessoas com o mesmo tempo de XP.
1.4 – cota de participação
Cada equipe deverá apoiar o evento com uma cota de R$ 50,00 (cinquenta reais) que serão convertidos nos brindes e prêmios do evento.
Esse valor dividido entre as 5 pessoas sai mais barato, então procure montar o time completo! ;D
1.5 – datas
O evento deve começar em uma sexta-feira, por volta de 20:00, e terminar em um domingo no mesmo horário.
Às 19:30 da sexta-feira será disponibilizado um documento explicando quais são os critérios a serem atendidos pelo projeto (requisitos do produto do hackathon).
A bancada avaliadora deve finalizar a avaliação dos projetos em alguns dias, podendo ser uma semana ou mais, dependendo do número de equipes participantes da competição.
2 – Avaliação de vencedores
A bancada avaliadora conta com um time de 4 pessoas, sendo 2 homens e 2 mulheres, e 1 voto é da comunidade.
2.1 – como funcionará o voto comunitário
A bancada avaliadora elenca 5 projetos finalistas, e desses 5 somente 3 serão vencedores, tendo primeiro, segundo e terceiro lugar.
A decisão final de vencedores funcionará via issue no repositório da edição do evento, onde a bancada avaliadora irá criar uma issue com os nomes das equipes e em seguida colocar 5 respostas, como nesse exemplo.
2.2 – critérios de avaliação
Após o concurso os mentores terão 5 dias para analisar todos os códigos e darem uma pontuação de 1 a 5 estrelas seguindo os critérios:
Clean code e escabilidade :
produto fluindo sem bugs (o projeto tem que funcionar)
código bem feito, escalável e manutenível
Ideia e como ela resolve o problema proposto
uma boa experiência de usuário
resolver bem o problema proposto (atendeu aos critérios informados antes da competição começar)
MVP(como a ideia será validada no mercado)
Após isso os jurados terão 3 dias para analisar os 3 finalistas(que já vão ganhar alguma coisa cada) e escolher o vencedor. Os jurados só analisarão os vencedores na segunda fase. E os mentores só vão pontuar na primeira fase.
Sendo que o peso da pontuação é exatamente o da ordem da lista acima, ou seja, o produto final precisa apresentar uma boa experiência de usuário e funcionar perfeitamente.
2.3 – vendendo o peixe
Cada time precisará entregar, junto com o seu projeto, um vídeo de 5 minutos explicando o produto e vendendo seu peixe para a bancada avaliadora e para a comunidade. Precisa dizer por que o seu produto é o melhor.
3 – Premiação
As 5 equipes finalistas irão receber prêmios de participação (brindes variados) e as 3 finalistas irão receber prêmios diferenciados.
Todas as pessoas que participarem do evento também receberão um brinde da comunidade Training Center referente ao Hackathon (como uma camiseta do evento, por exemplo).
4 – Comunicação
A comunicação de participantes pode ser feita como acharem melhor, via Skype, Hangouts, Appear.in, Discord, etc.
Sugerímos o uso do Discord por sua boa conexão.
A pessoa que estiver mentorando o time deve ficar nesse canal para ajudar a tirar dúvidas.
5 – Tema
O tema do evento deverá ser aberto ao público no dia da competição e seus requisitos devem estar em um documento de fácil acesso no repositório da edição.
6 – Apoio
Você pode apoiar o evento ajudando na organização, divulgação, financeiramente ou com brindes para distribuirmos entre os participantes.
As empresas apoiadoras do evento terão espaço de divulgação no site da edição.
Outros canais de divulgação, como podcasts, apoiadores também terão espaço de divulgação no site da edição.
As pessoas que apoiarem financeiramente o evento terão espaço de divulgação no repositório do projeto.
Everyone thinks they’re the best at a certain game. Whether it’s ping-pong, Mario Kart, Joust,
or even pickup basketball, everyone has their favorite casual game where they think they can
beat all their friends. We set out to find a way to prove, with mathematical evidence, that we
were better than them at certain games (and then cue the trash talk).
In about 2 months, we created a web app using React.js for the frontend and Python and the FlaskAPI for the backend. We used a modified Elo Algorithm to take games logged on the site and generate a set of rankings that would update every time a match was inputted. We then hosted on AWS allowing users to visit our site and log games. The web app ran for 3 months and in that time over 150 games were logged from over 50 players. For those 3 months, we completely changed how our friends played casual games.
But let’s first take a step back and look at the core algorithm that supports ELO Rank. What is an Elo Algorithm?
Hello ELO
Surprisingly, our inspiration to use an Elo algorithm didn’t originally stem from chess, but rather came from ranked competitive video games like League of Legends and FiveThirtyEight’s systems for rating NFL and MLB teams. We figured we could apply the same algorithm to casual games between friends to generate standings that prove who is the best and a given game.
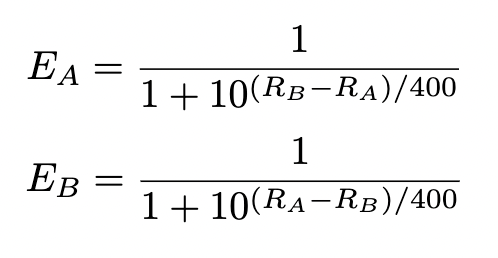
The Elo system is a rating system designed by Arpad Elo that uses Bayesian analysis to determine a player’s relative ranking compared to other players. Essentially, all players start out with a rating of 1500. When two players go against each other, we calculate the probability that each of them will win with the formula (using a logistic curve):
Most systems use (Rb-Ra)/400 which means that for every 400 rating points a player is above another player, they are 10x more likely to win than the other player.
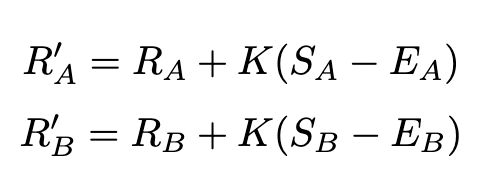
Let’s say that player A beat player B. Then both player’s ratings get adjusted by the formulas:
Where Sa is the actual outcome which in most cases means 1 for a win, 0 for a loss, and 0.5 for a tie (however you’ll see in a bit we do something slightly different). The Elo system is a closed system, so ratings points that are added to the winning player’s ranking are taken from the losing player’s rating. The K value is a constant that represents how much weight we should put on the most recent game. If the player with the lower rating wins, is it more because of luck or does it indicate that our prediction was wrong and the ratings need to be greatly adjusted. The K value can also be thought of as how much are the ratings going to change after each game. A higher K value means to higher jumps and drops of ratings after each game, and a lower K value means that a team would have to win or lose a lot of times for their rating to change dramatically. Most times, this value is fit based on pre-existing data, but since we didn’t have any data and we wanted it to work on many different games, we decided for a fairly high K value. This is because we wanted to increase engagement and player usage, so by having a high K value, the ratings would jump and drop much faster, so player rankings would be more volatile, preventing players from getting stuck at the bottom of the rankings and feeling like they couldn’t make it back up or having players that seemed untouchable as they stayed at the top of the leaderboard and nothing could dethrone them.
Unlike chess where the game can either result in a win, a loss, or a tie, most of the games we were interested in recording had a point system, so players could win 10-1 or 2-1 and we wanted to reflect this in the rankings. A team that just barely loses by one point shouldn’t loose as many ratings points as a team that was blown out, and likewise, if a team destroys another team, it doesn’t feel as good to only gain the same number of points as if you beat them by a point or two. To remedy this, we added a modifier that awards extra rating points for larger score differentials. We modified Sa using the following formula:
Other algorithms use modifications similar, for example, FiveThirtyEight’s NFL Elo system uses a natural log system that gives diminishing returns for larger and larger blowouts. We decided that since most of the games we would have a fixed point celling (most casual games are first to X points) we decided we didn’t need to factor in diminishing returns and wanted to maximum points for a shutout.
Our final adjustment was we wanted to be able to account for 2 vs. 2 matches (like playing doubles in ping-pong or 2 vs. 2 in Fifa). To do this, we simply converted Player A into Team A, and averaged the ratings of the two players to create a single R_Team A for all of the calculations. The ratings points awarded (or lost) would then be split evenly between the two players.
And there you have it. Our system in a nutshell. The Elo algorithm generates a prediction of the probability of each player winning based on the player’s ratings, then it updates the ratings based on the actual outcome of the game.
Post-game Analysis
The user response was absolutely staggering. We set up an AWS server to host our beta version and shared the link with our friends. Immediately it took off. Games started piling in, the trash talking started and leaders in the rankings started to emerge. At the end of the application’s 3 month uptime, we had over 50 users logging over 150 games.
After 3 months, we completely changed the way our friends played games. As it turns out, we ruined it. Watching people play, you could feel the air of competitiveness. We elevated the level of play, but in the process, we lost a lot of what made the games fun. Our friends liked the idea of getting the rankings and seeing who was the best. But once they got a high rating, they wanted to protect it. They would choose their partners based on ratings and would try to play games against weaker opponents to boost their ratings and avoid games they thought they might lose. Players would want to log the game if they won, but if they lost, they didn’t want it to affect their rating, leading to the classic “if I win, its ranked, if I lose, it was just practice.”
Eventually, we decided to close down the beta. We were left a little puzzled, how could something everyone loved (even when we shut it down, lots of games were still being logged) be something everyone also hated?
We realized that a lot of it came down to the fact that there was no way to agree and guarantee beforehand that a game was unranked. In chess and video games with ranking systems, the player chooses before they begin queuing for a game if they want to play ranked or not (in chess ranked matches are only at tournaments and most competitive video games have ranked and casual modes). These games have separate queues which ensures that if a player wants to play an unranked game, their opponent does as well. For our players, the groups usually were a mix of players who wanted to play ranked (usually players who had medium to high ratings and wanted to bolster them) and players who wanted to play casually (players who had lower ratings who just wanted to have fun and improve, not have their rating slide even more). This mix meant that there would often be matchups of half wanting ranked and half wanting casual, leading to casual players playing ranked games when they didn’t want to, causing frustration and adding a lot more pressure.
To solve this we came up with a few solutions that we could implement in the future. The best solution seemed to be creating a rotating system, so ranked matches happen for one week every 3-4 weeks. Games can be logged in the non-ranked time, but they wouldn’t change a player’s rating. This way, when the ranked week or weekend comes up, players would be more excited and less burnt out, and the players who don’t want to play ranked don’t constantly feel pressured to do so. These non-ranked games could still be used for stats and could also be used to generate seedings and matchups that would create the most interesting or most balanced games.
Right now, the application can only support one game and set of players at a time, so we had to create a different web app for each game and set of players, all of whom had to be added to the database directly. But eventually, we want to create a system where a player could sign up to the site and join different leagues for multiple different games that all work on the same web app, so a player could play in say his friend group’s Super Smash Brother’s league and his work’s ping-pong league all from the same site.
We also wanted to add a way to track stats other than just points scored such as aces in ping-pong. With multiple seasons for a league and more data points, we also wanted to use the data to update our algorithm. As we showed above, the K value represents how much weight to put on a single game’s outcome. With more data over longer periods, we could fit the K value for different games to get more accurate ratings. With this data, we could also fit the score modifier (how much the point differential affects the ratings) and how much each player’s rating changes (what game stats can best determine how much a player contributed to the win/loss and therefore how many rating points should they win/lose because of that?).
I went through a few libraries for profane languages like profanity, profanity-check and profanity-filter. While they’re all good in their own right, I couldn’t find one that suited my needs.
Installation
pip install PyProfane
Features
The special thing about this python library is that it uses soundex to detect even slightly misspelled words to detect if they’re profane or not. Of course this is not a mighty addition but I feel like this can be useful.
Please note that it uses an explicit blacklist which can be modified as when you need as I have included a function updateSwearwords(filename)
Usage
from PyProfane import censorWord, censorSentences, isProfane
sentence = "you're a piece of shit"
word = "slutty"
sentences = ["you're a piece of shit",
 'fucking whore',
 'why you such a cumslut',
 'an online whore',
 'fucking wanker',
 'hey, hope you do great!',
 'sluttyyyy whoreeee',
 'wear a dress']

print(isProfane(sentence))  # returns True

print(censorWord(word)) # returns 's%!$ty'

print(censorSentences(sentences))
'''
returns
["you're a piece of s!it",
 'f#%$ing w#%re',
 'why you such a cu#%$ut',
 'an online w#%re',
 'fu#%$ng w#%$er',
 'hey, hope you do great!',
 's#ut%$!yy w#o%$!ee',
 'wear a dress']
'''
Data
The data for swear words has been taken from a subset of:
A modern social media application built using Next.js, Hono, Drizzle ORM, and React Query. This app allows users to connect, share posts, and engage with a community.
Abstract: Neural networks have a number of shortcomings. Amongst the severest ones is the sensitivity to distribution shifts which allows models to be easily fooled into wrong predictions by small perturbations to inputs that are often imperceivable to humans and do not have to carry semantic meaning. Adversarial training poses a partial solution to address this issue by training models on worst-case perturbations. Yet, recent work has also pointed out that the reasoning in neural networks is different from humans. Humans identify objects by shape, while neural nets mainly employ texture cues. Exemplarily, a model trained on photographs will likely fail to generalize to datasets containing sketches. Interestingly, it was also shown that adversarial training seems to favorably increase the shift toward shape bias. In this work, we revisit this observation and provide an extensive analysis of this effect on various architectures, the common L2- and Linf-training, and Transformer-based models. Further, we provide a possible explanation for this phenomenon from a frequency perspective.
Citation
If you find our work useful in your research, please consider citing:
@InProceedings{Gavrikov_2023_CVPR,
    author    = {Gavrikov, Paul and Keuper, Janis and Keuper, Margret},
    title     = {An Extended Study of Human-Like Behavior Under Adversarial Training},
    booktitle = {Proceedings of the IEEE/CVF Conference on Computer Vision and Pattern Recognition (CVPR) Workshops},
    month     = {June},
    year      = {2023},
    pages     = {2360-2367}
}
It has no dependencies. You only need a C++17 compiler.
omm creates the necessary tables of pointers in compile time. So, no runtime overhead creating the tables.
omm offers template open multi-methods. See here for more information.
Installation
Put the omm.h file in your project and include it.
A simple tutorial
As an example, we will use matrices. For each method and their implementations we need to create a table, an ‘omm table’. This table needs 3 ingredients, a function signature telling what the ‘virtual types’ are, a struct containing the implementations of the method, and all the classes that participate in the selection of the correct implementation once the method is called.
First, consider the following matrix classes:
class Matrix{
  virtual ~Matrix(){}     //<---- The base class must have a virtual method.
  //...
};

class Diagonal : public Matrix{
  //...
}

class Orthogonal : public Matrix}{
  //...
}

class Invertible : public Matrix{
  //...
}
Note that the base class must have a virtual method. In fact, every virtual class that could appear in the signature (see the next section) must be polymorphic, in other words, must have at least a virtual method.
1st ingredient: WithSignature
In this case we want to add two matrices and return the result. We need to indicate this signature using ‘WithSignature’:
using add_template = WithSignature<Matrix*(Virtual<Matrix*>,Virtual<Matrix*>)>;
This signature is telling that the open multi-method will receive two pointers to objects of type Matrix or some of their daughter classes (Diagonal, Orthogonal or Invertible), and it will return a pointer to a Matrix. Note that we wrote Virtual<Matrix*> to indicate the parameters could be a derived class of Matrix. Only the parameters can be Virtual and these types can appear in any order. A more complex example could involve Virtual and non-Virtual types:
using complex_template = WithSignature<int(Virtual<BaseClass*>,int,float,Virtual<BaseClass2&>,Virtual<const BaseClass1&>,char)>
As you can see, Virtual types can be a pointer or a reference, and they can have cv-qualifiers too.
2nd ingredient: WithImplementations
Somehow, we need to tell omm where the implementations are. To do that, we are going to create a struct containing all the implementations and we will pass it to omm later. The visibility of each implementation must be public, so we use a struct instead of a class (you can create a class if you want of course). Also, make sure every function is static. Lastly, the name of each implementation must be implementation:
structadd_matrices{ // <-- Make sure the visibility of all the implementations is publicstatic Matrix* implementation(Diagonal* d1, Diagonal* d2){ // <-- Use static in each implementation// Add two diagonal matrices
}
static Matrix* implementation(Orthogonal* o, Diagonal* d){ // <-- Use static in each implementation// Add orthogonal and diagonal matrices
}
static Matrix* implementation(Invertible* i, Orthogonal* o){ // <-- Use static in each implementation// Add invertible and orthogonal matrices
}
//...
}
// We store the struct using WithImplementationsusing struct_implementations = WithImplementations<add_matrices>;
Note that we use WithImplementations to store the struct containing all the implementations. Also, observe that the signature of each implementation respects the signature passed to WithSignature in the previous section. The parameters are pointers to derived types of Matrix and the result is of type a pointer to Matrix.
3rd ingredient: WithDerivedTypes
In this case we are using 3 daughter classes of Matrix: Diagonal, Orthogonal and Invertible.
using derived_matrices = WithDerivedTypes<Diagonal,Ortogonal,Invertible>;
The order is irrelevant.
Creating the table
We use the 3 ingredients in the next order:
The implementations (WithImplementations)
The signature (WithSignature)
The derived types (WithDerivedTypes)
using add_matrices_table = table_omm<struct_implementations,add_template,derived_matrices>;
Accessing to the table
The table contains a call method that looks for the correct implementation and calls it. We can create a function that uses the call method:
Matriz* add(Matriz* m1, Matriz* m2){ // <-- Make sure the parameters and the result types respect the signature of `WithSignature`.returnadd_matrices_table::call(m1,m2); // <-- We call the `call` method with all the arguments.
}
Note that add and call has the same signature as the implementations.
You can see another example in the examples directory using two base classes, Animal and Shape.
Template open multi-methods
All the parameters that the omm table needs are types. So, we can use template parameters in our table. To illustrate how to do this, we will show how to create a method that adds two vectors of dependent inner type and size. Also, we will indicate the files where the code is written and we will see how to avoid cyclic dependencies.
// Vector.htemplate<typename T, unsignedint N>
classVector{
//...public:virtual~Vector(){} // We need at least a virtual method.
Vector<T,N> operator+(const Vector<T,N>& other) const;
};
Our objective will be to implement the + operator using multiple dispatch.
Another two vectors that specialize the first one:
Note that the implementation of the + operator must be in the header because Vector is a template class. However, we may need to include the rest of the daughter classes for being able to implement all the specializations. So, the next code will cause a cyclic dependency and the project will not compile:
// Vector.h
#include"omm.h"
#include"CanonVector.h"
#include"UnitVector"template<typename T, unsignedint N>
classVector{
//...public:virtual~Vector(){} // We need at least a virtual method.
Vector<T,N> operator+(const Vector<T,N>& other) const;
};
// ----------------------// Implementation here???// ----------------------
We can solve this by putting the implementations in a separate file.
Only one problem left. If we want to use the functions defined in this file, we must to include it. Ideally, we should include just the Vector.h file. For this, we only need to add this include at the end of the Vector.h file.
// Vector.htemplate<typename T, unsignedint N>
classVector{
//...public:virtual~Vector(){} // We need at least a virtual method.
Vector<T,N> operator+(const Vector<T,N>& other) const;
};
#include"VectorOperations.h"
Finally, let’s complete the implementations. The struct containing the implementations must be a template struct with the desired arguments.
// VectorOperations.h
#include"omm.h"
#include"Vector.h"
#include"UnitVector.h"
#include"CanonVector.h"template<typename T, unsignedint N>
structadd_vectors_impl{
static Vector<T,N> implementation(const Vector<T,N>& v1, const Vector<T,N>& v2){
std::cout << "Adding two simple vectors" << std::endl;
return v1;
}
static Vector<T,N> implementation(const CanonVector<T,N>& v1, const Vector<T,N>& v2){
std::cout << "Adding a canon vector and a simple vector" << std::endl;
return v1;
}
static Vector<T,N> implementation(const UnitVector<T,N>& v1, const UnitVector<T,N>& v2){
std::cout << "Adding two unit vectors" << std::endl;
return v1;
}
};
// ----------------------// The table will be here// ----------------------// -----------------------// The method will be here// -----------------------
Lastly, we create the table with the rest of the information and we implement the + operator.
Run the migrations to create all the required tables.
php artisan migrate
Usage
Creating a Survey
Creating a new Survey is easy! You can build your survey fluently just like
how you create all your Eloquent models in your app.
$survey = Survey::create(['name' => 'Cat Population Survey']);

$survey->questions()->create([
     'content' => 'How many cats do you have?',
     'type' => 'number',
     'rules' => ['numeric', 'min:0']
 ]);

$survey->questions()->create([
    'content' => 'What\'s the name of your first cat',
]);

$survey->questions()->create([
    'content' => 'Would you want a new cat?',
    'type' => 'radio',
    'options' => ['Yes', 'Oui']
]);
When creating your survey, you may set some constraints
to be enforced every time a new Entry is being created.
Allowing Guest Entries
By default, Entry models require a participant_id when being created.
If you wish to change this behaviour and accept guest entries,
set the accept-guest-entries option on your Survey model.
All Survey models default to accept only 1 entry per unique participant.
You may adjust the limit-per-participant option on your Survey model
or set it to -1 to remove this limit altogether.
Note that this setting will be ignored if the accept-guest-entries option is activated.
Validation
Defining Validation Rules
Add in a rules attribute when you’re creating your Question to specify the validation logic
for the answers being received.
Question::create([
    'content' => 'How many cats do you have?',
    'rules' => ['numeric', 'min:0']
]);
Note that as opposed to the survey constraints, the question validators
are not automatically triggered during the entry creation process.
To validate the answers, you should manually run the validation in your controller (see below)
Validating Submissions
Validate user’s input against the entire rule set of your Survey using Laravel’s built in validator.
This package comes with boilerplate Bootstrap 4.0 views
to display the surveys and some basic question types.
These views are meant to serve as examples, and
may not be sufficient for your final use case.
To display a survey in a card, include the survey partial in your views:
@include('survey::standard', ['survey'=>$survey])
Question Types
These are the question types included out of the box:
text – Accepting text answers
number – Accepting numeric answers
radio – Options presented as radio buttons, accepting 1 option for the answer
multiselect – Options presented as checkboxes, accepting multiple options for the answer
Customizing the Views
To customize the boilerplate views shipped with this package run package:publish with the views tag.
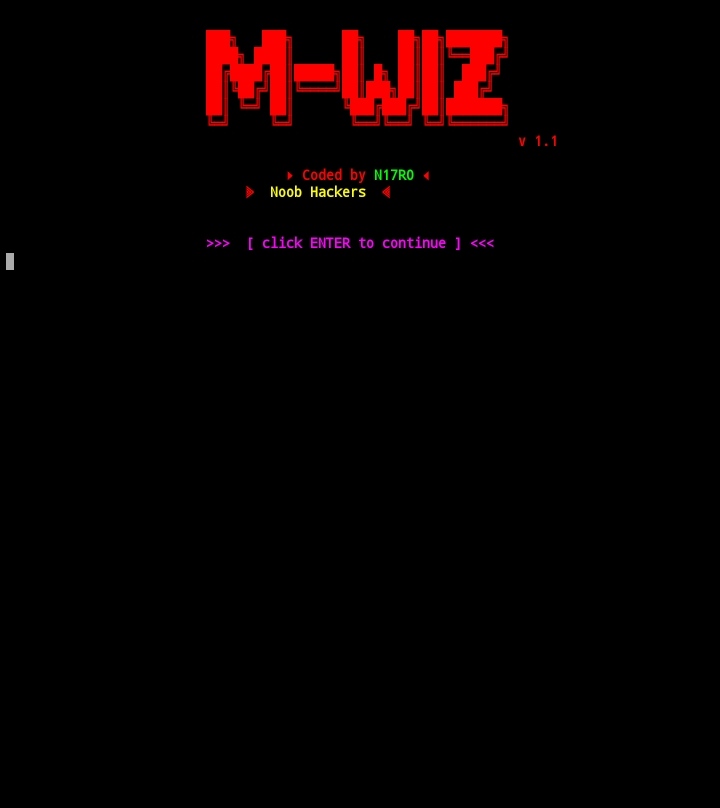
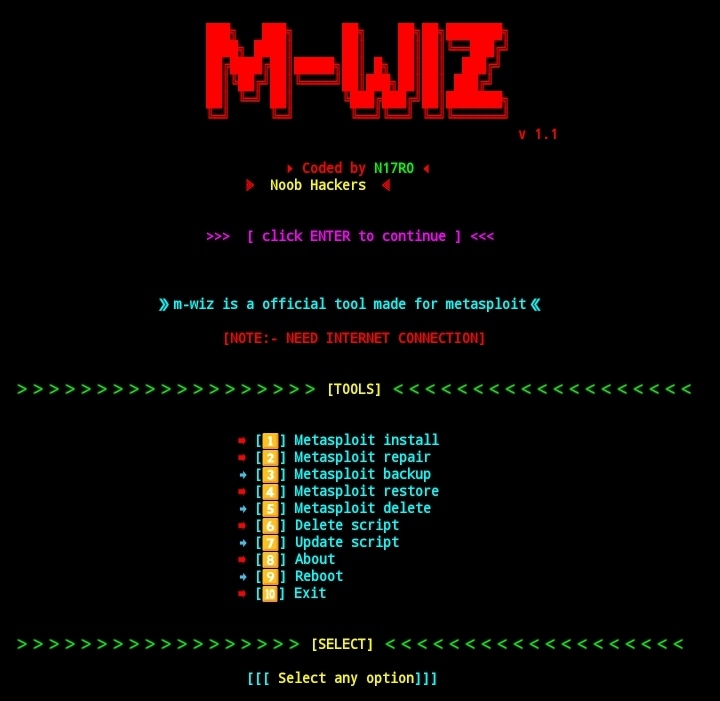
M-wiz is a bash based script which is officially made for metasploit-framework users of termux from this tool in just one click you can install metasploit, repair it, update it, and backup up it and lot more. This tool works on both rooted Android device and Non-rooted Android device.
AVAILABLE ON :
Termux
TESTED ON :
Termux
REQUIREMENTS :
internet 600 MB
external storage permission
storage 1Gb
1gb ram
FEATURES :
[+] Install Metasploit !
[+] Updated maintainence !
[+] Easy for beginners !
[+] Repairt metasploit !
[+] FIxed ruby issue !
INSTALLATION [Termux] :
apt-get update -y
apt-get upgrade -y
pkg install python -y
pkg install python2 -y
pkg install git -y
pip install lolcat
git clone https://github.com/noob-hackers/m-wiz
cd $HOME
ls
cd m-wiz
ls
bash m-wiz.sh
[+]-- Now you need internet connection to continue further process...
[+]-- You can select any option by clicking on your keyboard
[+]-- Note:- Don't delete any of the scripts included in core directory (folder)
USAGE OPTIONS [Termux] :
METAPLOIT INSTALL :
From this option you can install metasploit-framework in termux application without any issue in just one click and the installation can take time upto 30 minutes.
IN METASLOIT v1.3 :
The low end device is supported to run metasploit a new version selection option has been added for 4.4 version devices and 6.0 version devices
METASPLOIT REPAIR :
From this option you can repair metasploit-framework if it’s not working properly in termux application.
METASPLOIT BACKUP :
From this option you can backup your metasploit-framework into your device internal storage without any issue without losing any data.
METASPLOIT RESTORE :
From this option you can restore your backed up metasploit-framework from your internal storage.
METASPLOIT DELETE :
From this tool you can delete your old metasploit-framework from your termux application easyli.
UPDATE :
From this option you can update m-wiz tool if updates are available for that.
ABOUT :
From this option you can read about author.
CHAT :
From this option you can chat with coder.
SUBSCRIBE :
From this option you can subscribe channel.
FOLLOW :
From this option you can follow noob hackers.
EXIT :
From this option you can exit from m-wiz tool
SCREEN SHOTS [Termux]
WATCH VIDEO [Termux]
CONNECT WITH US :
BUY ME A COFFEE :
WARNING :
This tool is only for educational purpose. If you use this tool for other purposes except education we will not be responsible in such cases.


 https://github.com/f1tz/bwh-monitor-widget-for-scriptable