A lot of documentation (wiki) and user forums were previously hosted at http://mldonkey.sourceforge.net, but were shut down on August 21, 2023,
see issue #90 for the details and links to the data dumps (help needed to restore them to the usable form).
GitHub Discussions serves as a replacement for the forum for the time being.
Build
Supported OCaml versions are >= 4.03 and < 5.0, see mldonkey.opam for canonical information.
GTK2 GUI (./configure --enable-gui=newgui2) builds only in specific configuration when lablgtk2 packages
are installed in $(ocamlc -where)/lablgtk2. This happens to be true on Debian when building with packaged (system) ocaml :
It is known to not work with opam – this is the goal for the next release (only gui is affected, core itself builds fine in opam).
./configure --enable-batch --enable-gui=newgui2 (ie download and build lablgtk2 locally) only works with old OCaml versions (e.g. 4.05.0)
because it is using very old lablgtk2. Upgrading to the newer lablgtk2 is the goal for the next release
HappyFeat – Interactive framework for clinical BCI applications
HappyFeat is a software aiming to to simplify the use of BCI pipelines in clinical settings. More precisely, it is a software assitant for extracting and selecting classification features for BCI.
It gathers all necessary manipulations and analysis in a single convenient GUI, and automates experimental or analytic parameters. The resulting workflow allows for effortlessly selecting the best features, helping to achieve good BCI performance in time-constrained environments. Alternative features based on Functional Connectivity can be used and compared or combined with Power Spectral Density, allowing a network-oriented approach.
It consists of Qt-based GUIs and Python toolboxes, allowing to realize all steps for customizing and fine-tuning a BCI system: feature extraction & selection, classifier training.
HappyFeat also allows to interface with BCI softwares (OpenViBE for the moment!) in order to facilitate the whole BCI workflow, from data acquisition to online classification.
The focus is put on ease of use, trial-and-error training of the classifier, and fast and efficient analysis of features of interest from BCI sessions.
Key Features
Easy to use GUI allowing to extract and visualize classification features, and select the most relevant ones for training a classifier.
Use Spectral Power or Coherence-based features for classification. HappyFeat allows to extract & visualize both types of features in parallel, and mix them at the training level.
Feature selection and classifier training can be done multiple times in a row, until satisfactory results are achieved.
A worspace management system keeps tracks of all extraction- and training-related manipulations, and enables a high degree of reproducibility.
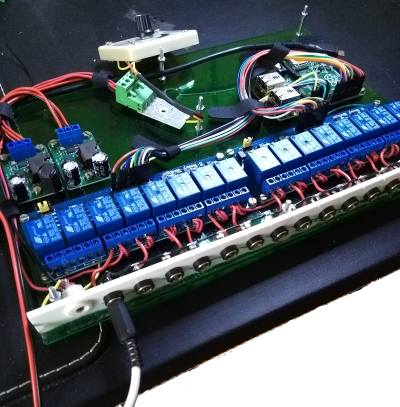
StairsJs is a minimal NodeJS app to automatically drive the stairs LED lights using 2 passive infra red detectors (PIRs) and uses the current sunset and sunrise times to activate the stair LED lights when someone enters the PIR detection zone.
It can run by it own (after installation no internet required). It uses 3rd party packages for logging (bunyan), determination of sunset and sunrise (suncalc) and of course a package for the input and output GPIO (onoff).
Purpose
The goal of this project is to build a nice led-light for my stairs (which I renovated recently) and to learn the raspberry PI, nodeJS and GPIO programming
Hardware and Electric Scheme
List of each component with a link to specification and a global schematic overview with the list of used pin’s of the raspberry PI can be found on the wiki page
Pictures
Installation notes
Prerequisites: You need node and npm installed on your RPI system. You can check if you have it installed in a terminal window with:
NOTE: Use npm install –only=production to install only dependencies, and not devDependencies,regardless of the value of the NODE_ENV environment variable.
Run the program
use one of the following commands
node stairsJs

npm start
or use PM2 (auto starts / auto restart the program after boot)
include code quality check (JSLint or something else..)
create a GUI client to show status and gain control of the stairs logic, using web-technology. This is currently under development, see stairsJs-control-panel
If you used this to build your own stairs-led-light then send me a picture ; love to see it !.
This repository contains the code for a simple car rental system implemented in Java. It includes several Java classes that work together to manage car rentals, customers, and rental records.
The Car.java file contains the class definition for the Car object. This class represents a car that can be rented in the system. It includes properties such as the car’s make, model, year, and rental status. It also provides methods to get and set these properties.
Main.java
The Main.java file contains the main entry point for the car rental system. It provides a simple command-line interface for users to interact with the system. Users can perform actions such as renting a car, returning a car, and viewing rental records.
Person.java
The Person.java file contains the class definition for the Person object. This class represents a person who can rent a car in the system. It includes properties such as the person’s name, contact information, and rental history. It also provides methods to get and set these properties.
Rent.java
The Rent.java file contains the class definition for the Rent object. This class represents a car rental transaction in the system. It includes properties such as the rented car, the renting person, and the rental duration. It also provides methods to get and set these properties.
RentRecord.java
The RentRecord.java file contains the class definition for the RentRecord object. This class represents a record of a car rental in the system. It includes properties such as the rental ID, the rented car, the renting person, the rental start date, and the rental end date. It also provides methods to get and set these properties.
Contributing
If you would like to contribute to this project, you can follow these steps:
Fork the repository on GitHub.
Clone the forked repository to your local machine.
Create a new branch for your changes.
Make your modifications or add new features.
Test your changes to ensure they work correctly.
Commit your changes and push them to your forked repository.
Submit a pull request to the original repository, describing your changes in detail.
Please make sure to adhere to the existing coding style and conventions used in the project. Also, ensure that your changes are well-documented and accompanied by appropriate test cases.
We appreciate any contributions, including bug fixes, new features, and improvements to the existing codebase.
Contact
If you have any questions or suggestions regarding this project, you can contact the project maintainers at johnrhuell@gmail.com.
Thank you for your interest in this car rental system!
There’re some secrets management systems for NixOS (agenix, sops-nix), but they require kinda complicated setup. In many cases it’s enough to just decrypt all the secrets with root-readable key file present on disk (if someone has root access to your computer, you’re probably already royally fucked).
Solution
Use a simple encryption program and put the config into a NixOS module. Just like this:
# flake.nix{inputs={classified={url="github:GoldsteinE/classified";# to avoid having one more copy of nixpkgsinputs.nixpkgs.follows="nixpkgs";# you can also do this with naersk};};outputs={nixpkgs,classified, ... }: {nixosConfigurations.your-hostname=nixpkgs.lib.nixosSystemrec{system="x86_64-linux";modules=[# other modules here./configuration.nixclassified.nixosModules."${system}".default];};};}
and then
# configuration.nix{classified={# Default is `/var/secrets`.# Note that this should be an empty directory:# while the service is running, all the files in that directory# will be masked by the tmpfs mount and not accessible.targetDir="/var/classfied";keys={first="/path/to/first.key";second="/path/to/second.key";};files={top-secret={# You can omit the `key` attribute if you have exactly one key configuredkey="first";encrypted=./encrypted-file;# Default is `400`mode="440";# Defaults are `root:root`user="nginx";group="nogroup";};};};}
Generating keys and encrypting data
# (as root)umask 377 # so the key file has the right permissions
classified gen-key > /path/to/key
cat /path/to/key # key is just 24 words, so you can write it downumask 022 # it's ok for encrypted data to be world-readable
classified encrypt --key /path/to/key /path/to/secret-data > /path/to/encrypted-data
# if you ever want to manually decrypt it
classified decrypt --key /path/to/key /path/to/encrypted-data
What’s inside?
XChaCha20-Poly1305 which is proven secure. The nonce is chosen randomly for every encrypted file.
A fresh tmpfs is created on every decryption, so old secrets are not available.
No temporary files are written, no Rust unsafe code is used, and the codebase is small and easy to audit yourself.
It attempts to zeroize any keys and decrypted files before deallocating memory.
So it’s secure?
I mean…
It didn’t pass any kind of professional security review.
Zeroizing memory is hard and should be considered best-effort.
So (as with any cryptography project) — use at your own risk.
We believe in a future in which the web is a preferred environment for numerical computation. To help realize this future, we’ve built stdlib. stdlib is a standard library, with an emphasis on numerical and scientific computation, written in JavaScript (and C) for execution in browsers and in Node.js.
The library is fully decomposable, being architected in such a way that you can swap out and mix and match APIs and functionality to cater to your exact preferences and use cases.
When you use stdlib, you can be absolutely certain that you are using the most thorough, rigorous, well-written, studied, documented, tested, measured, and high-quality code out there.
To join us in bringing numerical computing to the web, get started by checking us out on GitHub, and please consider financially supporting stdlib. We greatly appreciate your continued support!
dmidrange
Calculate the mid-range of a double-precision floating-point strided array.
The mid-range, or mid-extreme, is the arithmetic mean of the maximum and minimum values in a data set. The measure is the midpoint of the range and a measure of central tendency.
Installation
npm install @stdlib/stats-base-dmidrange
Alternatively,
To load the package in a website via a script tag without installation and bundlers, use the ES Module available on the esm branch (see README).
If you are using Deno, visit the deno branch (see README for usage intructions).
The branches.md file summarizes the available branches and displays a diagram illustrating their relationships.
To view installation and usage instructions specific to each branch build, be sure to explicitly navigate to the respective README files on each branch, as linked to above.
The N and stride parameters determine which elements in the strided array are accessed at runtime. For example, to compute the mid-range of every other element in x,
The function has the following additional parameters:
offsetX: starting index for x.
While typed array views mandate a view offset based on the underlying buffer, the offset parameter supports indexing semantics based on a starting index. For example, to calculate the mid-range for every other element in x starting from the second element
This package is part of stdlib, a standard library for JavaScript and Node.js, with an emphasis on numerical and scientific computing. The library provides a collection of robust, high performance libraries for mathematics, statistics, streams, utilities, and more.
For more information on the project, filing bug reports and feature requests, and guidance on how to develop stdlib, see the main project repository.
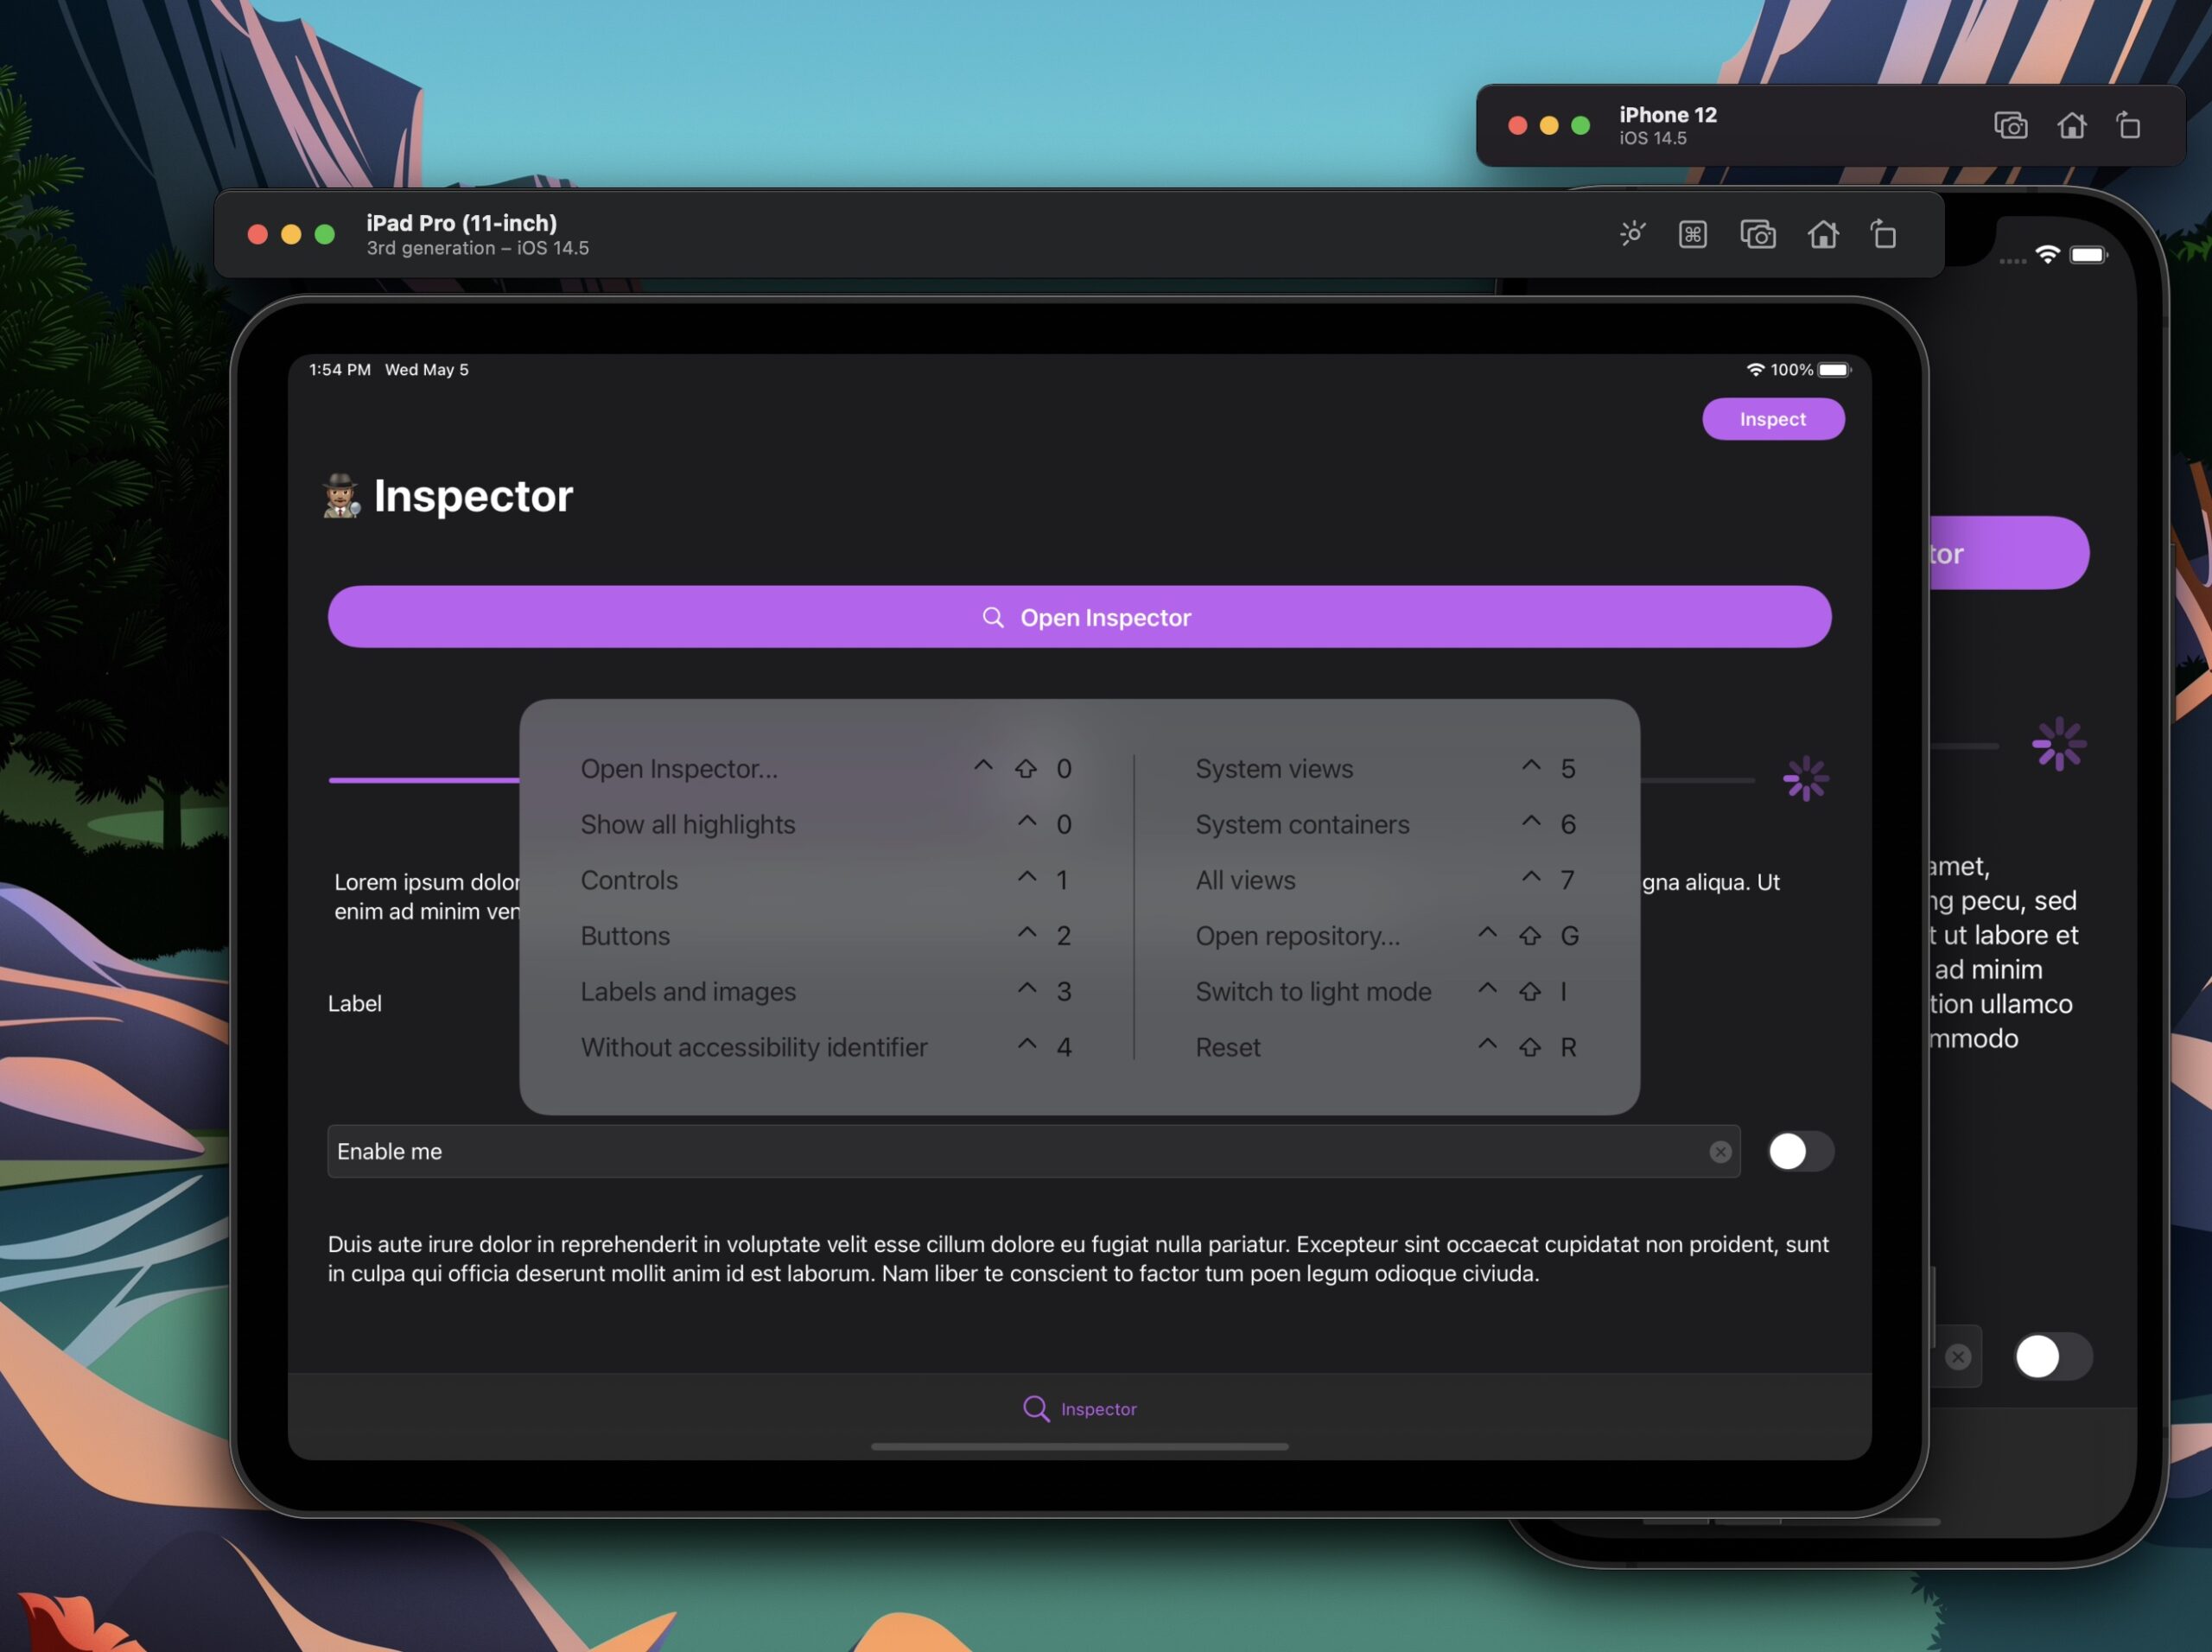
Add your own custom commands to the main Inspector interface and make use of key commands while using the Simulator.app (and also on iPad).
Create layer views by any criteria you choose to help you visualize application state: class, a property, anything.
Inspect view hierarchy faster then using Xcode’s built-in one, or
Inspect view hierarchy without Xcode.
Test changes and fix views live.
Improve QA and Designer feedback with a reverse Zeplin
Inspect view hierarchy without Xcode.
Test changes and fix views live.
Easily validate specific state behaviors.
Better understanding of the inner-workings of components
Give more accurate feedback for developers.
Installation
Swift Package Manager
The Swift Package Manager is a tool for automating the distribution of Swift code and is integrated into the swift compiler. It is in early development, but Inspector does support its use on supported platforms.
Once you have your Swift package set up, adding Inspector as a dependency is as easy as adding it to the dependencies value of your Package.swift.
// Add to Package.swift
// For projects with iOS 11+ support
dependencies:[.package(url:"https://github.com/ipedro/Inspector.git",.upToNextMajor(from:"2.0.0"))]
// For projects with iOS 14+ support
dependencies:[.package(url:"https://github.com/ipedro/Inspector.git",.upToNextMajor(from:"3.0.0"))]
// Scene Delegate Example
import UIKit
// Your application will not be rejected if you include the Inspector framework in your final bundle, however it's recommended that you import it only when debugging.
#if DEBUGimport Inspector
#endiffinalclassSceneDelegate:UIResponder,UIWindowSceneDelegate{varwindow:UIWindow?func scene(_ scene:UIScene, willConnectTo session:UISceneSession, options connectionOptions:UIScene.ConnectionOptions){guardlet _ =(scene as?UIWindowScene)else{return}(...)#if DEBUGInspector.setConfiguration(...) // Optional. Add link to InspectorConfiguration
Inspector.setCustomization(...) // Optional. Pass an object that conforms to the `InspectorCustomizationProviding` protocol.
Inspector.start()#endif}(...)}
AppDelegate.swift
// App Delegate Example
import UIKit
// Your application will not be rejected if you include the Inspector framework in your final bundle, however it's recommended that you import it only when debugging.
#if DEBUGimport Inspector
#endiffinalclassAppDelegate:UIResponder,UIApplicationDelegate{varwindow:UIWindow?func application(_ application:UIApplication, didFinishLaunchingWithOptions launchOptions:[UIApplication.LaunchOptionsKey:Any]?)->Bool{(...)#if DEBUGInspector.setConfiguration(...) // Optional. Add link to InspectorConfiguration
Inspector.setCustomization(...) // Optional. Pass an object that conforms to the `InspectorCustomizationProviding` protocol.
Inspector.start()#endifreturntrue}(...)}
SwiftUI (Beta)
Please note that SwiftUI support is in early stages and any feedback is welcome.
// Add to your main view, or another view of your choosing
import Inspector
import SwiftUI
structContentView:View{@Statevartext="Hello, world!"@Statevardate=Date()@StatevarisInspecting=falsevarbody:someView{NavigationView{ScrollView{VStack(spacing:15){DatePicker("Date", selection: $date).datePickerStyle(GraphicalDatePickerStyle())TextField("text field", text: $text).textFieldStyle(RoundedBorderTextFieldStyle()).padding()Button("Inspect"){
isInspecting.toggle()}.padding()}.padding(20)}.inspect(
isPresented: $isInspecting,
viewHierarchyLayers:nil,
elementColorProvider:nil,
commandGroups:nil,
elementLibraries:nil).navigationTitle("SwiftUI Inspector")}}}
Enable Key Commands (Recommended)
Extend the root view controller class to enable Inspector key commands.
// Add to your root view controller.
#if DEBUGoverridevarkeyCommands:[UIKeyCommand]?{returnInspector.keyCommands
}#endif
Remove framework files from release builds (Recommended)
In your app target:
Add a New Run Script Phase as the last phase.
Then paste the script below to remove all Inspector related files from your release builds.
# Run Script Phase that removes `Inspector` and all its dependecies from release builds.if [ $CONFIGURATION=="Release" ];thenecho"Removing Inspector and dependencies from $TARGET_BUILD_DIR/$FULL_PRODUCT_NAME/"
find $TARGET_BUILD_DIR/$FULL_PRODUCT_NAME -name "Inspector*"| grep .| xargs rm -rf
find $TARGET_BUILD_DIR/$FULL_PRODUCT_NAME -name "UIKeyCommandTableView*"| grep .| xargs rm -rf
find $TARGET_BUILD_DIR/$FULL_PRODUCT_NAME -name "UIKeyboardAnimatable*"| grep .| xargs rm -rf
find $TARGET_BUILD_DIR/$FULL_PRODUCT_NAME -name "UIKitOptions*"| grep .| xargs rm -rf
find $TARGET_BUILD_DIR/$FULL_PRODUCT_NAME -name "Coordinator*"| grep .| xargs rm -rf
fi
Presenting the Inspector
The inspector can be presented from any view controller or window instance by calling the presentInspector(animated:_:) method. And that you can achieve in all sorts of creative ways, heres some suggestions.
Using built-in Key Commands (Available on Simulator and iPads)
You can also present Inspector using a gesture, like shaking the device. That way no UI needs to be introduced. One convienient way to do it is subclassing (or extending) UIWindow with the following code:
// Declare inside a subclass or UIWindow extension.
#if DEBUGopenoverridefunc motionBegan(_ motion:UIEvent.EventSubtype, with event:UIEvent?){
super.motionBegan(motion, with: event)guard motion ==.motionShake else{return}Inspector.present()}#endif
Adding custom UI
After creating a custom interface on your app, such as a floating button, or any other control of your choosing, you can call Inspector.present(animated:) yourself.
// Add to any view controller if your view inherits from `UIControl`
varmyControl:MyControloverridefunc viewDidLoad(){
super.viewDidLoad()
myControl.addTarget(self, action: #selector(tap), for:.touchUpInside)}@objcprivatefunc tap(_ sender:Any){Inspector.present(animated:true)}
Customization
Inspector allows you to customize and introduce new behavior on views specific to your codebase, through the InspectorCustomizationProviding Protocol.
var viewHierarchyLayers: [Inspector.ViewHierarchyLayer]? { get }
ViewHierarchyLayer are toggleable and shown in the Highlight views section on the Inspector interface, and also can be triggered with Ctrl + Shift + 1 - 8. You can use one of the default ones or create your own.
progressIndicators: Shows all progress indicator views.
scrollViews: Shows all scroll views.
segmentedControls: Shows all segmented controls.
spacerViews: Shows all spacer views.
stackViews: Shows all stack views.
tableViewCells: Shows all table view cells.
collectionViewReusableVies: Shows all collection resusable views.
collectionViewCells: Shows all collection view cells.
staticTexts: Shows all static texts.
switches: Shows all switches.
tables: Shows all table views.
textFields: Shows all text fields.
textViews: Shows all text views.
textInputs: Shows all text inputs.
webViews: Shows all web views.
allViews: Highlights all views.
systemContainers: Highlights all system containers.
withIdentifier: Highlights views with an accessbility identifier.
withoutIdentifier: Highlights views without an accessbility identifier.
wireframes: Shows frames of all views.
internalViews: Highlights all.
// Example
varviewHierarchyLayers:[Inspector.ViewHierarchyLayer]?{[.controls,.buttons,.staticTexts +.images,.layer(
name:"Without accessibility identifiers",
filter:{ element inguardlet accessibilityIdentifier = element.accessibilityIdentifier?.trimmingCharacters(in:.whitespacesAndNewlines)else{returntrue}return accessibilityIdentifier.isEmpty
})]}
var elementIconProvider: Inspector.ElementIconProvider? { get }
Return your own icons for custom classes or override exsiting ones. Preferred size is 32 x 32
// Example
varelementIconProvider:Inspector.ElementIconProvider?{.init { view inswitch view {case is MyView:returnUIImage(named:"my-view-icon-32")default:
// you can alwayws fallback to default icons
returnnil}}}
var elementColorProvider: Inspector.ElementColorProvider? { get }
Return your own color scheme for the hierarchy label colors, instead of (or to extend) the default color scheme.
// Example
varelementColorProvider:Inspector.ElementColorProvider?{.init { view inswitch view {case is MyView:return.systemPink
default:
// you can alwayws fallback to default color scheme if needed
returnnil}}}
var commandGroups: [Inspector.CommandGroup]? { get }
Command groups appear as sections on the main Inspector UI and can have key command shortcuts associated with them, you can have as many groups, with as many commands as you want.
// Example
varcommandGroups:[Inspector.CommandGroup]?{guardlet window = window else{return[]}[.group(
commands:[.command(
title:"Reset",
icon:.exampleCommandIcon,
keyCommand:.control(.shift(.key("r"))),
closure:{
// Instantiates a new initial view controller on a Storyboard application.
letstoryboard=UIStoryboard(name:"Main", bundle:nil)letvc= storyboard.instantiateInitialViewController()
// set new instance as the root view controller
window.rootViewController = vc
// restart inspector
Inspector.restart()})])]}
var elementLibraries: [Inspector.ElementPanelType: [InspectorElementLibraryProtocol]] { get }
Element Libraries are entities that conform to InspectorElementLibraryProtocol and are each tied to a unique type. Pro-tip: Use enumerations.
// Example
varelementLibraries:[Inspector.ElementPanelType:[InspectorElementLibraryProtocol]]{[.attributes:ExampleElementLibrary.allCases]}
// Element Library Example
import UIKit
import Inspector
enumExampleAttributesLibrary:InspectorElementLibraryProtocol,CaseIterable{case roundedButton
vartargetClass:AnyClass{switchself{case.roundedButton:returnRoundedButton.self
}}func sections(for object:NSObject)->InspectorElementSections{switchself{case.roundedButton:return.init(with:RoundedButtonAttributesSectionDataSource(with: object))}}}
Therefore, you first need to install Scriptable from the App Store.
Preview
User Guide
Description
The project includes bwh_monitor.js and bwh_monitor_mini.js, and it is recommended to use medium widgets and small widgets accordingly.
The small widget omits field descriptions due to space constraints and retains only the icons. The correspondence for all icons is as follows:
📌 Node info
🖥 IP address
🪫 RAM usage
💿 Disk space
⏳ Data used
⏱️ Data reset time
Get API Key
Access the API module in the Kiwi control panel to obtain veid and apikey.
Add component and configure parameters.
When adding a component, use Parameter to pass arguments.
There are three parameters:
veid: The veid obtained from Kiwi.
apikey: The apikey obtained from Kiwi.
title: [Optional] The title of the widget. If not specified, the hostname will be used as the default title.
The parameters can be passed as follows:
# Required parameters
veid=1xxxxx&apikey=private_xxxxxxxxxxxxxxxxxx

OR

# The title parameter is optional
veid=1xxxxx&apikey=private_xxxxxxxxxxxxxxxxxx&title=I_AM_Title
Thank you & References
Inspiration and code copied from, thanks to @412999826 for open-sourcing.